入门 - Vue中vue-router实现原理详解
入门 - Vue中vue-router实现原理详解
vue-router概念
vue-router是Vue官方推出的路由管理器,它和vue.js是深度集成的,主要用于管理URL,实现URL和组件的对应,以及通过URL进行组件之间的切换,通过改变URL,在不重新请求页面的情况下,更新页面视图,从而使构建单页面应用变得更加简单。
vue-router是基于路由和组件的
- 路由用户设定访问路径的,将路径和组件映射起来;
- 在vue-router的单页面应用中,页面的路径的改变就是组件的切换。
vue-router模式
更新视图但不重新请求页面,是前端路由原理的核心之一,目前在浏览器环境中这一功能的实现主要有2种方式:
- Hash — 默认值,利用 URL 中的
hash("#"); - history — 利用URL中的路径(
/home)。
设置路由模式
const router=new VueRouter({
mode:'history',
routes:[...]
})
mode区别
mode:“hash” 多了 “#”
http://localhost:8080/#/login
mode:“history”
http://localhost:8080/home
HashHistory
hash("#")的作用是加载URL中指示网页中的位置。#号后面的hash值,可通过 window.location.hash 获取
特点
- hash不会被包括在http请求中,对服务器端完全无用,因此,改变 hash 不会重新加载页面。
- 可以为hash的改变添加监听事件:
window.addEventListener("hashchange",funcRef,false) - 每一次改变
hash(window.localtion.hash),都会在浏览器访问历史中增加一个记录。 - 利用hash的以上特点,就可以来实现前端路由 "更新视图但不重新请求页面" 的功能了。
HashHistory拥有两个方法:HashHistory.push() 和HashHistory.replace()
HashHistory.push()
HashHistory.push() 将新路由添加到浏览器访问历史的栈顶
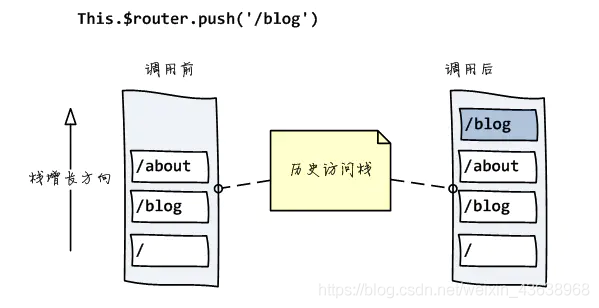
从设置路由改变到视图更新的流程:
$router.push() --> HashHistory.push() -->History.transitionTo() --> History.updateRoute() --> {app._route = route} --> vm.render()
解释
$router.push() //调用方法
HashHistory.push()//根据hash模式调用,设置hash并添加到浏览器历史记录(添加到栈顶)(window.location.hash= XXX)
History.transitionTo() //监测更新,更新则调用History.updateRoute()
History.updateRoute() //更新路由
{app._route= route} //替换当前app路由
vm.render() //更新视图
HashHistory.replace()
replace()方法与push()方法不同之处在于,它并不是将新路由添加到浏览器访问历史的栈顶,而是替换掉当前的路由。
HTML5History
早期History通过back()、forward()、go()等方法,我们可以读取浏览器历史记录栈的信息。 从HTML5开始History提供了2个新的方法:pushState()、replaceState(),使得我们可以对浏览器历史记录栈进行修改:
window.history.pushState(data, title, targetURL);
- @状态对象:传给目标路由的信息,可为空;
- @页面标题:目前所有浏览器都不支持,填空字符串即可;
- @可选url:目标url,不会检查url是否存在,且不能跨域。如不传该项,即给当前url添加data。
window.history.replaceState(data, title, targetURL);
- @类似于pushState,但是会直接替换掉当前url,而不会在history中留下记录。
假定当前网址是example.com/1.html,使用pushState()方法在浏览记录(History 对象)中添加一个新记录。
var stateObj = { foo: 'bar' };
history.pushState(stateObj, 'page 2', '2.html');
添加新记录后,浏览器地址栏立刻显示example.com/2.html,但并不会跳转到2.html,甚至也不会检查2.html是否存在,它只是成为浏览历史中的最新记录。
这2个方法有个共同的特点:当调用他们修改浏览器历史栈后,虽然当前url改变了,但浏览器不会立即发送请求该url,这就为单页应用前端路由,更新视图但不重新请求页面提供了基础。
更多操作:
history.pushState({page: 1}, 'title 1', '?page=1')
// URL 显示为 http://example.com/example.html?page=1

history.pushState({page: 2}, 'title 2', '?page=2');
// URL 显示为 http://example.com/example.html?page=2

history.replaceState({page: 3}, 'title 3', '?page=3');
// URL 显示为 http://example.com/example.html?page=3

history.back()
// URL 显示为 http://example.com/example.html?page=1

history.back()
// URL 显示为 http://example.com/example.html

history.go(2)
// URL 显示为 http://example.com/example.html?page=3
监听地址变化
在HTML5History的构造函数中监听popState(window.onpopstate)
popstate事件会在点击后退、前进按钮(或调用history.back()、history.forward()、history.go()方法)时触发。前提是不能真的发生了页面跳转,而是在由history.pushState()或者history.replaceState()形成的历史节点中前进后退
注意:用
history.pushState()或者history.replaceState()不会触发popstate事件。
window.onpopstate = function(event) {
console.log(event.state);
console.log(window.history.state;);
};
以上两种方式皆可获取之前在pushState和replaceState中传入的data
注意,页面第一次加载的时候,浏览器不会触发popstate事件。
两种模式区别
- pushState设置的新URL可以是与当前URL同源的任意URL;而hash只可修改#后面的部分,故只可设置与当前同文档的URL
- pushState通过stateObject可以添加任意类型的数据到记录中;而hash只可添加短字符串
- pushState可额外设置title属性供后续使用
- history模式则会将URL修改得就和正常请求后端的URL一样,如后端没有配置对应/user/id的路由处理,则会返回404错误
辅助学习代码:
<!DOCTYPE html>
<html lang="en">

<head>
    <meta charset="UTF-8">
    <title>pushState</title>
    <style type="text/css">
    .hidden {
        display: none;
    }
    </style>
<script src="http://libs.baidu.com/jquery/2.0.0/jquery.min.js"></script>
</head>

<body>
    <section id="step1" class="step-contain" step="1">
        <p>第1步</p>
        <button class="step-btn" step="1">下一步</button>
    </section>
    <section id="step2" class="step-contain hidden" step="2">
        <p>第2步</p>
        <button class="step-btn" step="2">下一步</button>
    </section>
    <section id="step3" class="step-contain hidden" step="3">
        <p>第3步</p>
    </section>
    <script type="text/javascript">
    $(function() {
        stepProgress();

        function stepProgress() {
            var options = {
                curStep: 1,
                nextStep: null
            }
            var defaultState={
                "step": options.curStep,
                 "url": "#step=" + options.curStep
            }
            window.history.pushState(defaultState, "", defaultState.url);
            $(".step-btn").on("click", function() {
                var step = parseInt($(this).attr("step"));
                options.nextStep = step + 1;
                var state = {
                    "step": options.nextStep,
                    "url": "#step=" + options.nextStep
                }
                window.history.pushState(state, "", state.url);
                console.log(state.step)
                swapStaus(options.nextStep);
            });

            function swapStaus(step) {
                $(".step-contain").each(function() {
                    var tmpStep = $(this).attr("step");
                    if (parseInt(tmpStep) == step) {
                        $("#step" + tmpStep).removeClass("hidden");
                    } else {
                        $("#step" + tmpStep).addClass("hidden");
                    }
                });
                options.curStep = step;
            }

            $(window).on("popstate",function(){
                var currentState = history.state;
                goStep=currentState.step?currentState.step:1;
                swapStaus(goStep)
            })
        }

    })
    </script>
</body>

</html>
引用资料
- https://blog.csdn.net/m0_62351590/article/details/122933654