入门 - vue整个过程的生命周期详解
入门 - vue整个过程的生命周期详解
生命周期概念
Vue的生命周期就是vue实例从创建到销毁的全过程,也就是new Vue()开始就是vue生命周期的开始。Vue 实例有⼀个完整的⽣命周期,也就是从开始创建、初始化数据、编译模版、挂载Dom->渲染、更新->渲染、卸载 等⼀系列过程,称这是Vue的⽣命周期。钩子函数是Vue生命周期中每个阶段对外开放让程序员操作Vue的接口。Vue有8个钩子函数。
每个vue实例从创建到销毁的过程都是一个生命周期,也会运行对应的钩子函数,下图为Vue生命周期示意图:
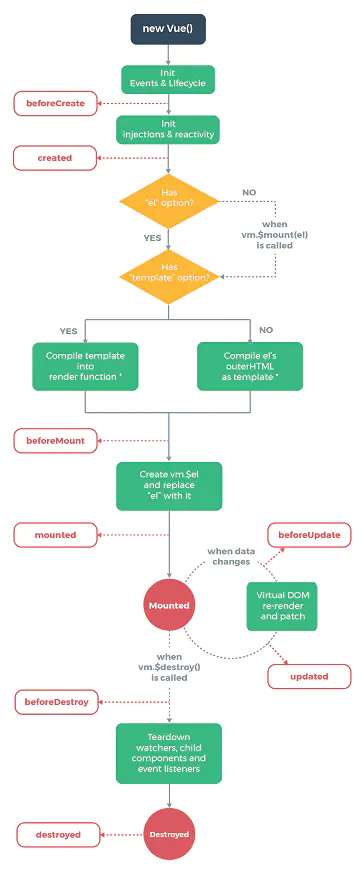
8个钩子函数
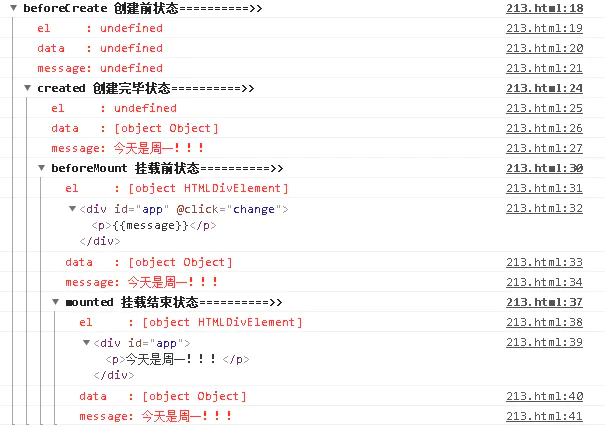
1. beforeCreate
官方解释: 在实例初始化之后,数据观测(data observer)和event/watcher事件配置之前被调用。
说明:这个时候this还不能使用,data中的数据、methods中的方法,以及watcher中的事件都不能获得。
var vm = new Vue({
el: '#app',
data: {
    message: '今天是周一!!!'
},
beforeCreate(){
    console.group('beforeCreate 创建前状态==========>>');
    console.log("%c%s", "color:red", "el     : "+this.$el);   //undefined
    console.log("%c%s", "color:red", "data   : "+this.$data); //undefined
    console.log("%c%s", "color:red", "message: "+this.message);   //undefined
},
//...
2. created
官方解释: 实例已经创建完成之后被调用。在这一步,实例已完成以下的配置:数据观测(data observer),属性和方法的运算,watch/event 事件回调。然而,挂载阶段还没开始,$el属性目前不可见。
说明:这个时候可以操作vue中的数据和方法,但是还不能对dom节点进行操作。
//...
created(){
    console.group('created 创建完毕状态==========>>');
    console.log("%c%s", "color:red", "el     : "+this.$el);   //undefined
    console.log("%c%s", "color:red", "data   : "+this.$data); //[object Object]
    console.log("%c%s", "color:red", "message: "+this.message);   //今天是周一!!!
},
//...
3. beforeMount
官方解释: 在挂载开始之前被调用:相关的render函数首次被调用。
说明:$el属性已存在,是虚拟dom,只是数据未挂载到模板中。
//...
beforeMount(){
    console.group('beforeMount 挂载前状态==========>>');
    console.log("%c%s", "color:red", "el     : "+this.$el);   //[object HTMLDivElement]
    console.log(this.$el);
    console.log("%c%s", "color:red", "data   : "+this.$data); //[object Object]
    console.log("%c%s", "color:red", "message: "+this.message);   //今天是周一!!!
},
//...
4. mounted
官方解释: el被新创建的vm.$el替换,并挂载到实例上去之后调用该钩子。如果 root 实例挂载了一个文档内元素,当mounted被调用时vm.$el也在文档内。
注意mounted不会承诺所有的子组件也都一起被挂载。如果你希望等到整个视图都渲染完毕,可以用vm.$nextTick替换掉mounted
说明:挂载完毕,这时dom节点被渲染到文档内,dom操作在此时能正常进行
//...
mounted(){
console.group('mounted 挂载结束状态==========>>');
console.log("%c%s", "color:red", "el     : "+this.$el);   //[object HTMLDivElement]
console.log(this.$el);
console.log("%c%s", "color:red", "data   : "+this.$data); //[object Object]
console.log("%c%s", "color:red", "message: "+this.message);   //今天是周一!!!
},
//...
点击页面中的元素执行相应的事件,并触发beforeUpdate和updated钩子函数。
5. beforeUpdate
官方解释: 数据更新时调用,发生在虚拟 DOM 打补丁之前。这里适合在更新之前访问现有的 DOM,比如手动移除已添加的事件监听器。
说明:beforeUpdate是指view层的数据变化前,不是data中的数据改变前触发。因为Vue是数据驱动的。
//...
beforeUpdate(){
console.group('beforeUpdate 更新前状态==========>>');
console.log("%c%s", "color:red", "el     : "+this.$el);   //[object HTMLDivElement]
console.log(this.$el);
console.log(this.$el.innerHTML);    //<p>今天是周一!!!</p>
console.log("%c%s", "color:red", "data   : "+this.$data); //[object Object]
console.log("%c%s", "color:red", "message: "+this.message);   //今天周二了!!!
},
//...
6. updated
官方解释: 由于数据更改导致的虚拟DOM重新渲染和打补丁,在这之后会调用该钩子。
当这个钩子被调用时,组件DOM已经更新,所以你现在可以执行依赖于DOM的操作。然而在大多数情况下,你应该避免在此期间更改状态。如果要相应状态改变,通常最好使用计算属性或watcher取而代之。
注意updated不会承诺所有的子组件也都一起被重绘。如果你希望等到整个视图都重绘完毕,可以用vm.$nextTick替换掉 updated:
说明:view层的数据更新后,data中的数据同beforeUpdate,都是更新完以后的。
//...
updated(){
console.group('updated 更新完成状态==========>>');
console.log("%c%s", "color:red", "el     : "+this.$el);   //[object HTMLDivElement]
console.log(this.$el);
console.log(this.$el.innerHTML);    //<p>今天周二了!!!</p>
console.log("%c%s", "color:red", "data   : "+this.$data); //[object Object]
console.log("%c%s", "color:red", "message: "+this.message);   //今天周二了!!!
},
//...
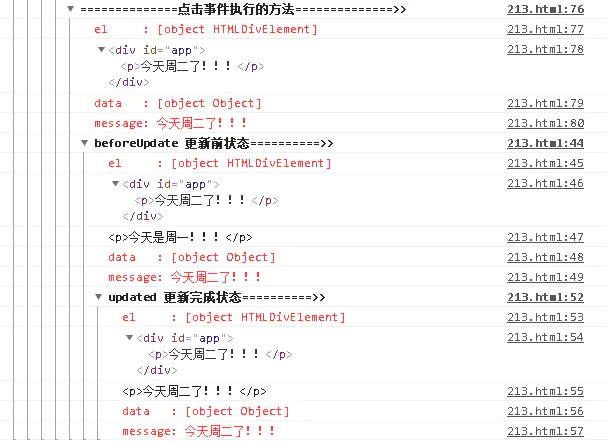
注意:细心的小伙伴会发现beforeUpdate和updated钩子函数中的$el一样,根据官方理解beforeUpdate应该指向虚拟dom,所以才会一样,而dom中的真正内容不一样,但是beforeMount和mouted钩子函数中为什么又会有区别呢?感觉是设计的不足之处。
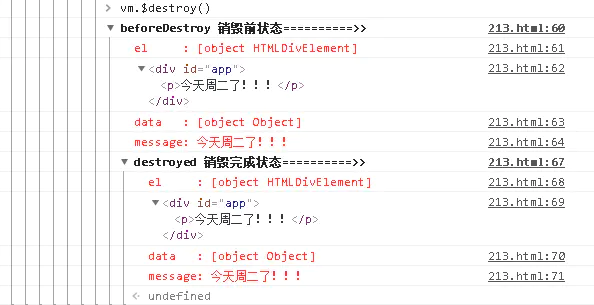
执行vm.$destroy()函数触发beforeDestroy和destoryed钩子函数
7. beforeDestroy
官方解释: 实例销毁之前调用。在这一步,实例仍然完全可用。
说明:
//...
beforeDestroy(){
console.group('beforeDestroy 销毁前状态==========>>');
console.log("%c%s", "color:red", "el     : "+this.$el);   //[object HTMLDivElement]
console.log(this.$el);
console.log("%c%s", "color:red", "data   : "+this.$data); //[object Object]
console.log("%c%s", "color:red", "message: "+this.message);   //今天周二了!!!
},
//...
8. destroyed
官方解释: Vue实例销毁后调用。调用后,Vue实例指示的所有东西都会解绑定,所有的事件监听器会被移除,所有的子实例也会被销毁。
说明:执行destroy方法后,对data的改变不会再触发周期函数,此时的vue实例已经解除了事件监听以及和dom的绑定,但是dom结构依然存在。
//...
destroyed(){
console.group('destroyed 销毁完成状态==========>>');
console.log("%c%s", "color:red", "el     : "+this.$el);   //[object HTMLDivElement]
console.log(this.$el);
console.log("%c%s", "color:red", "data   : "+this.$data); //[object Object]
console.log("%c%s", "color:red", "message: "+this.message);   //今天周二了!!!
},
//...
代码如下:
<!DOCTYPE html>
<html>
<head>
    <title></title>
</head>
<body>
<div id="app" @click="change">
    <p>{{message}}</p>
</div>
<script src="https://cdn.bootcss.com/vue/2.6.10/vue.min.js"></script>
<script type="text/javascript">
var vm = new Vue({
    el: '#app',
    data: {
        message: '今天是周一!!!'
    },
    beforeCreate(){
        console.group('beforeCreate 创建前状态==========>>');
        console.log("%c%s", "color:red", "el     : "+this.$el);   //undefined
        console.log("%c%s", "color:red", "data   : "+this.$data); //undefined
        console.log("%c%s", "color:red", "message: "+this.message);   //undefined
    },
    created(){
        console.group('created 创建完毕状态==========>>');
        console.log("%c%s", "color:red", "el     : "+this.$el);   //undefined
        console.log("%c%s", "color:red", "data   : "+this.$data); //[object Object]
        console.log("%c%s", "color:red", "message: "+this.message);   //今天是周一!!!
    },
    beforeMount(){
        console.group('beforeMount 挂载前状态==========>>');
        console.log("%c%s", "color:red", "el     : "+this.$el);   //[object HTMLDivElement]
        console.log(this.$el);
        console.log("%c%s", "color:red", "data   : "+this.$data); //[object Object]
        console.log("%c%s", "color:red", "message: "+this.message);   //今天是周一!!!
    },
    mounted(){
        console.group('mounted 挂载结束状态==========>>');
        console.log("%c%s", "color:red", "el     : "+this.$el);   //[object HTMLDivElement]
        console.log(this.$el);
        console.log("%c%s", "color:red", "data   : "+this.$data); //[object Object]
        console.log("%c%s", "color:red", "message: "+this.message);   //今天是周一!!!
    },
    beforeUpdate(){
        console.group('beforeUpdate 更新前状态==========>>');
        console.log("%c%s", "color:red", "el     : "+this.$el);   //[object HTMLDivElement]
        console.log(this.$el);
        console.log(this.$el.innerHTML);    //<p>今天是周一!!!</p>
        console.log("%c%s", "color:red", "data   : "+this.$data); //[object Object]
        console.log("%c%s", "color:red", "message: "+this.message);   //今天周二了!!!
    },
    updated(){
        console.group('updated 更新完成状态==========>>');
        console.log("%c%s", "color:red", "el     : "+this.$el);   //[object HTMLDivElement]
        console.log(this.$el);
        console.log(this.$el.innerHTML);    //<p>今天周二了!!!</p>
        console.log("%c%s", "color:red", "data   : "+this.$data); //[object Object]
        console.log("%c%s", "color:red", "message: "+this.message);   //今天周二了!!!
    },
    beforeDestroy(){
        console.group('beforeDestroy 销毁前状态==========>>');
        console.log("%c%s", "color:red", "el     : "+this.$el);   //[object HTMLDivElement]
        console.log(this.$el);
        console.log("%c%s", "color:red", "data   : "+this.$data); //[object Object]
        console.log("%c%s", "color:red", "message: "+this.message);   //今天周二了!!!
    },
    destroyed(){
        console.group('destroyed 销毁完成状态==========>>');
        console.log("%c%s", "color:red", "el     : "+this.$el);   //[object HTMLDivElement]
        console.log(this.$el);
        console.log("%c%s", "color:red", "data   : "+this.$data); //[object Object]
        console.log("%c%s", "color:red", "message: "+this.message);   //今天周二了!!!
    },
    methods: {
        change(){
            this.message = "今天周二了!!!";
            console.group("==============点击事件执行的方法==============>>");
            console.log("%c%s", "color:red", "el     : "+this.$el);   //[object HTMLDivElement]
            console.log(this.$el);
            console.log("%c%s", "color:red", "data   : "+this.$data); //[object Object]
            console.log("%c%s", "color:red", "message: "+this.message);   //今天周二了!!!
        }
    }
})
</script>
</body>
</html>
函数执行顺序
1. 生命周期执行顺序
- 页面初始化时:beforeCreate -> created -> beforeMount -> mounted
- 页面发生修改时:beforeUpdate -> updated
- 页面销毁时:beforeDestroy -> destroyed
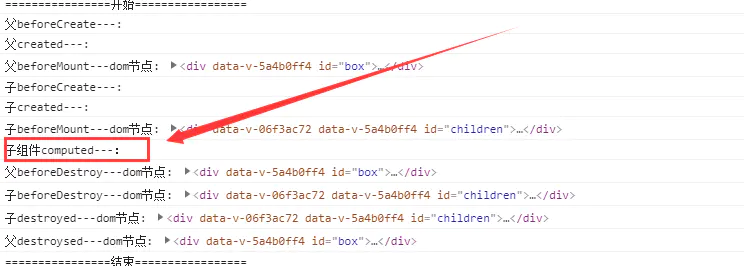
2. 父子组件生命周期执行顺序
- 页面初始化时:父beforeCreate -> 父created -> 父beforeMount ->子beforeCreate -> 子created -> 子beforeMount -> 子mounted-> 父mounted
从图中可以看到,子组件要先于父组件挂载完成。
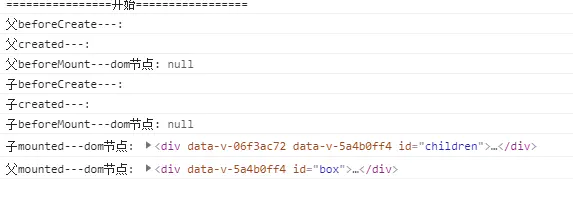
- 页面发生修改时:beforeUpdate -> updated 父、子组件间的更新互不影响,只更新自己。
- 页面销毁时:父beforeDestroy -> 子beforeDestroy ->子destroyed->父 destroyed 销毁时也是子组件要先于父组件销毁

3. this.$nextTick在各生命周期的执行顺序
- nextTick在各生命周期的执行顺序,nextTick是指在dom渲染完成后执行,结果如图。
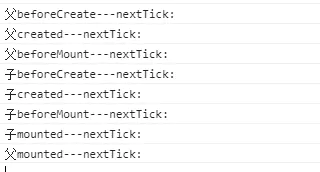
- 虽然每个周期使用$nextTick都可以获取到dom,但是还是建议在mounted中使用哈,因为beforeMount/mounted本来就是挂载dom滴~
4. watch、computed、methods执行顺序
- 页面初始化时: 会执行一次computed,watch初始化时不会执行,methods只有调用的时候才会执行。
- 渲染完成后,触发methods: methods -> watch -> computed

总结
- beforecreate:可以在这加个loading事件;
- created :在这结束loading,还做一些初始化,实现函数自执行;
- mounted : 在这发起后端请求,拿回数据,配合路由钩子做一些事情;
- beforeDestory: 你确认删除vue实例了吗?
- destoryed :当前实例已被销毁,解绑相关指令和事件监听器。
引用资料
- https://www.jianshu.com/p/7026b73bb626/
- https://www.jianshu.com/p/f412bff6da82